Rubber banding
Sat Sep 20 2025
Imagine you have a series of points and you want to draw a single line around all of them. This sounds relatively simple, but if you just drew lines between the centers of the balls, it would look like a jumbled, tangled mess. This line wouldn't wrap around the outside.
To achieve this, we're going to dive into a couple of really interesting algorithms, and with a little bit of geometry, we'll create a dynamic, bouncing, rubber-band effect.
Here's our plan:
- We'll use a physics simulation to make a series of points bounce around the screen.
- We'll figure out how to draw a "rope" that wraps around the outside of those points.
- We'll use the concept of tangent points to make sure the rope looks like it's wrapping smoothly around the circles and not just drawing straight lines from center to center.
Part 0: Setting up
The first part of the simulation involves creating a series of animated points and, naively, drawing some lines between them. This is all pretty basic.
Part 1: Finding the hull
The first challenge is to identify which points form the outer boundary. The line needs to be drawn only around the points on the very edge of the group, not the ones in the middle. The solution lies in an algorithm called the convex hull.
The convex hull is the smallest convex polygon containing all the points. A great way to visualize this is to imagine a set of nails hammered into a board. The convex hull is the shape a rubber band would form if you stretched it around all the nails and let it snap tight.
We'll use Jarvis March, also known as the Gift Wrapping algorithm, to find the convex hull of our points. The name is a great way to think about it - we're literally "wrapping" the points, one by one, to find the outer boundary.
The core of our demo is the findHull function. Let's break down how it works, here's that function:
function findHull(ps) {
  ps.sort((a, b) => a.x - b.x); // Sort the points left-to-right
  const startPoint = ps[0]
  const hull = [startPoint.clone()];
  let currentPoint = startPoint, nextPoint;
  let i = 0;
  do {
    if(i++ > 1000) break; // Break out condition
    nextPoint = ps[0] === currentPoint ? ps[1] : ps[0];
    for(let i = 0; i < ps.length; i++) {
      const cp = ps[i]; // Candidate point
      if(cp === currentPoint) continue;

      const pq = nextPoint.subtractNew(currentPoint);
      const pr = cp.subtractNew(currentPoint);

      const cross = crossp(pr, pq);

      if(cross > 0) {
        nextPoint = cp;
      } else if(cross === 0) {
        if(pr.lengthSquared > pr.lengthSquared)
          nextPoint = cp;
      }
    }
    hull.push(nextPoint.clone());
    currentPoint = nextPoint;

  } while(currentPoint !== startPoint)

  return hull;
}
Let's break down how this algorithm works:
- First, we take the list of points to run the algorithm across and sort it, making sure the points are in order from left to right.
- Then we find a point that's guaranteed to be on the hull. The leftmost point is always a good place to start.
- We loop through all the other points from our starting point to find the next one that creates the largest counter-clockwise (CCW) turn. This is the "wrapping" part.
- How do we figure out which point creates the most significant CCW turn? We use a cool trick from geometry called the cross product. Our
crosspfunction takes two vectors (2 point candidates) and returns a number that tells us their orientation relative to each other.- If the cross product is positive, the new candidate point is to the "left" of our current path, which means it's a better candidate for our hull.
- If it's negative, it's to the "right," and we can ignore it.
- If it's zero, the points are on the same line.
- We keep iterating and replacing our "next best" point with any new candidate that produces a positive cross-product.
- Once we've found the next point on the hull, we make it our new "current" point and repeat the process. We continue this loop until we return to our starting point, completing the loop and our "wrap."
Part 2: Drawing the rope with tangent points
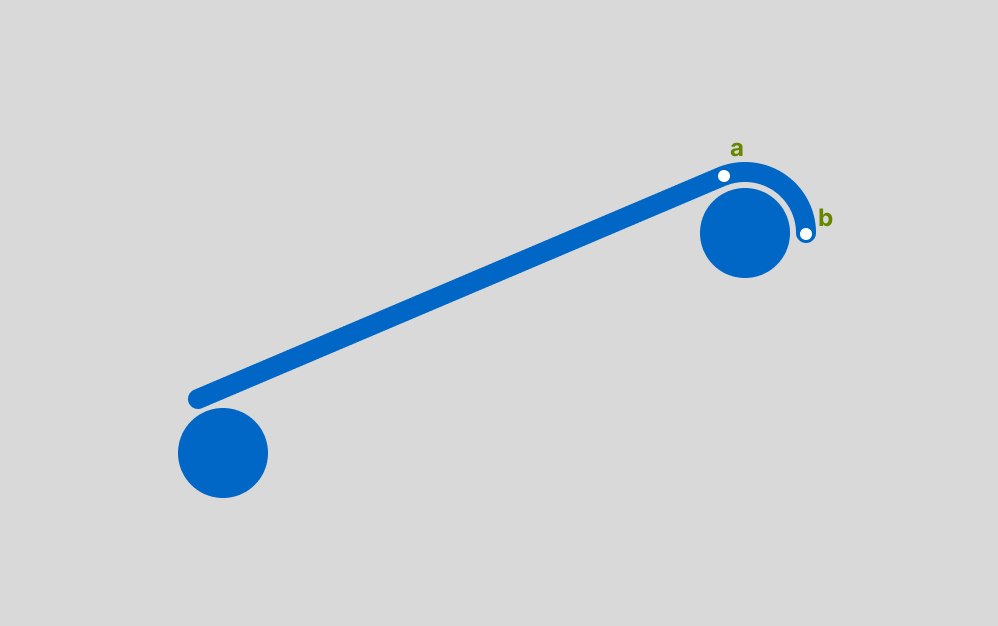
Now that we have the sequence of points that make up our convex hull, we must draw the rope. Simply drawing lines between the centers of the points won't look right (as you can see above); the rope should appear to wrap around the outside of each circle.
This is where the concept of tangent points comes in, and our getTangentPoints function.
Imagine a line running between the centers of two of our circles on the hull. We need to find the points on the circumference of each circle where our "rope" will touch. These are the tangent points.
The getTangentPoints function uses some simple vector math to find them. It takes the vector between the two circle centers, finds the vector perpendicular to it (called the normal), and then offsets the center of each circle along that normal by the radius. This gives us the exact coordinates for the rope to start and end on each circle.

const getTangentPoints = (p1, p2, radius = settings.lineDistance) => {
  const dir = p2.subtractNew(p1).normalise();
  const normal = new Vec2(dir.y, -dir.x);
  const t1 = p1.addNew(normal.scaleNew(radius));
  const t2 = p2.addNew(normal.scaleNew(radius));
  return { start: t1, end: t2, radius, normal };
};- First, the function calculates a vector that points from the center of the first circle (p1) to the center of the second (p2). The vector is then normalized to a length of 1, providing a clean direction without distance.
- Next, the function computes a normal vector, which is a vector that is perpendicular to the direction vector found in the first step. This normal vector points "outward" from the line connecting the two circles.
- Finally, the function uses the normal vector to find the exact coordinates of the tangent points. It offsets the center of each circle (
p1andp2) along thenormalvector by the specifiedradius. This gives us the final two tangent points (t1andt2) on the circumference of each circle.
In our draw loop, we go through each pair of points on the hull. We use getTangentPoints to get point a, the end point of the current straight line segment, and point b, the start point of the next straight line segment. Then, we draw an arc around the curve of the circle, creating a seamless line between a and b.
Bringing it all together.
We've found our convex hull and figured out how to draw the perfect "rope" around the circles. Now, for the final touch - the animation.
Our runLoop function does all the heavy lifting for us every frame. It updates the position of our points using a simple sine wave and some basic collision detection to keep them bouncing within the screen's boundaries. It's a simple animation that creates the illusion of the physics of tension between the rubber bands.
You might have noticed that we also include two "anchor" points in our array of points. These are just stationary points at the bottom of the screen that are also included in the convex hull calculation, giving the rope something to "hang" from and creating that nice, pendulous look.
Finally, we use the Tweakpane library to add some controls. This lets us play with the number of points, the speed of the animation, and the thickness of the rope, allowing us to interact with the algorithm in real-time. Make sure to play around with the properties!